PagesPat's Ponderings

Saturday, October 27, 2012

My Book of Lists


Just had to show you another project with the Queen Kat Designs stamp Ruby Slippers from artist Melia Newman.  I used my Copics to color these beautiful spike heels, but the colors came out a little on the plum side of red, instead of ruby.  I decided to roll with it instead of coloring a new stamped image, and found the perfect Fall embellishments to complement it.

I found this cool skinny notebook with the ugliest blue foam cover, but the loveliest long papers for making lists.  Did I mention that I am list-addicted?  Yup, give me a pad of paper and I'll make a list--groceries, errands, to do, Christmas cards--doesn't matter, as long as I can pen it in and cross it off.

So I made this handy dandy Book of Lists and gave it a Fall feel with patterned paper, embellishments and especially my colored version of Ruby Slippers.

Now which list do I start with?  Today I think I'll make a list of all the things I'm thankful for, starting with my lovely collection of rubber from QKD.  Don't have any of your own yet?  Why don't you start yours today by checking out the Shoppe?

Friday, October 26, 2012

To Have and to Hold

So I was so busy creating some baskets for the wedding ceremony that I forgot I had to create a card for the bride and groom!  I had some time last night and got inked up and sparkly, and thought I would do the same to some paper-haha!!
I cruised Pinterest for some inspiration and chose a few styles from which to make my final choice.  The one I went with was originally created by Ashatanka and her inspiration card is at the end of my post.
Meanwhile, I chose to start with a cream colored textured cardstock and used distress ink in Faded Jeans by Tim Holtz.
I inked the edges of a piece of vintage music sheet snagged at an estate sale and covered half the card.  Where the two designs meet in the middle, I added some flourish bling and several white and cream colored roses.  A 3D sticker of a key finishes off the front.
On the inside, I printed out a quote also found on Pinterest about how a couple should treat marriage, again embellishing the page with some inked up music sheet.  On the "signature" side, I stamped a sentiment and added some bling and another key sticker.
The real test for this project was creating an envelope think enough to hold my chunky card.  Out came my Ultimate Tool from Crafters' Companion and the Envelo-Boxer piece and voila!
I scored and folded and glued this box together after covering it in more pieces of music sheets, not only inking them but adding some ModPodge and very fine glitter.  The white and cream fibers that I tied off in a bow are just for the presentation.  A piece of velcro at the envelope's edge keeps it closed.
The wedding is tomorrow night, and except for figuring out what to wear, I am set!!
Here is the original inspiration card:


Wednesday, October 24, 2012

Another Wedding?!

Thank goodness it's not another of my kids, since the only one left is my 17 year old daughter!!  No, this wedding is for my boss' daughter, and she and her soon-to-be hubby will tie the knot on Friday this week.  Her color scheme is Navy and white, and she and he like a rustic feel to the event.
So, knowing how crafty her employee is (blushing), my boss asked that I create a box for the flower girl to carry down the aisle.  She saw one online and the rest is, well, right here:

Since I couldn't find a wooden box to save my life, I bought a paper mache box and covered it with patterned paper to resemble distressed wood.  The handle is made out of (almost) half a small grapevine wreath, although it made life easier to glue it onto a metal handle first, that I removed from a basket snagged at my local Goodwill store.  I attached it to the box with hot glue.  The white silk roses are hot glued onto the ends of the "handle" to cover imperfections and to make a nice presentation when the little flower girl comes walking down the aisle.  The bride specifically asked for cinnamon-colored printing.
Then I got a text last night from my boss (did I mention she is also one of my bestest friends?), asking if I could do another, smaller project.  It was a basket to hold cards from the guests.  All I had to do was change out the autumn-themed charms for these monogram charms and paint over the little wooden sign's original message, replacing it with the date of the wedding:
So that's two weddings for which I have created mementos and necessaries.  Now I wish my daughter-in-law's friend would call me with her Quinceanera invitation commission!  I'm going to need at least three months to make those, and would love to talk with her about the design and colors.  Wish me luck!!
And as always, keep crafting!!

Monday, October 22, 2012

Ready for Some Spooky Fun?

This little ghost is!!!  He's even got his Vampire costume on, and his mom made him bring a flashlight for safety.  He's about to scare up some Halloween candy in yon village back there!
I used two Squigglefly digi images on today's card.  The "Ghost Vampire" is a digi by artist Denise Clemmensen.  It's a new release for October, and selling fast!!  I used my Copics to give him some Fall colors and adhered the bottom part onto the front piece of my card that I covered with leftover patterned paper.
The background digi image sets my Trick-or-Treating scene.  It's called Quaint Little Village by artist Gemma Mortlock.  I wanted Ghost Vampire to "steal the show" on my card, so instead of coloring the village with my usual modis operandi, I used a blending tool and a Kaleidoscope Green/Blue Ink Pad from Stampin Up to give it a touch of color.
I was going to make an easel card, but instead made a stair step card.  I just folded the front "step" at 1" and again at 1" to make the first mountain fold.  I then folded the back "step" in half and adhered my "Quaint Village" on the front side.
The only embellishment on my card is the little ghost in the left-handed corner.  I think the images speak for themselves!
This is my card for this week's Squigglefly Challenge, which has issued a fall-themed card challenge! "choose any or all of your favorite fall theme colors:  oranges, browns, yellows, rusty reds or olive greens OR pick a Fall theme--falling leaves, Thanksgiving, Pumpkins, Halloween...."
Obviously, my mind is still on Halloween, so...
Now it's your turn.  Use a Squigglefly digi image and a Fall theme and you could win a free digi!

Saturday, October 20, 2012

ZigZag Fold Card with Queen Kat Designs


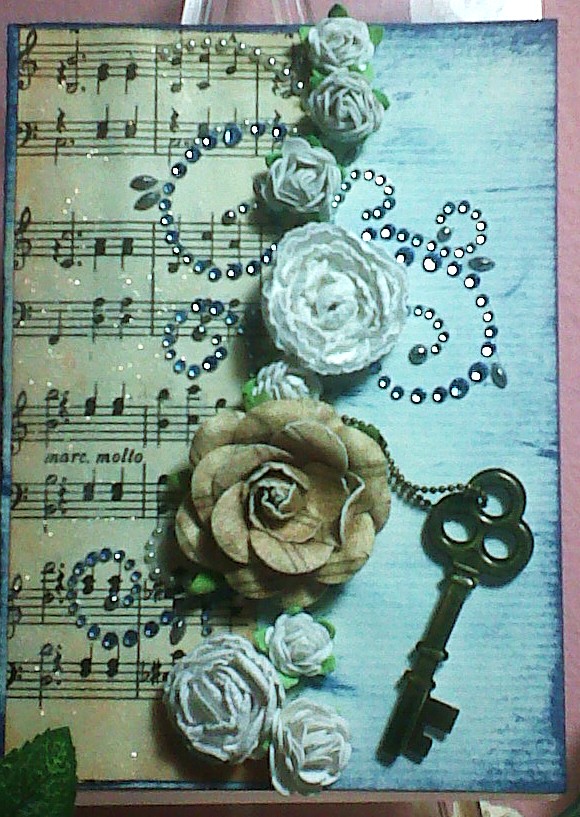
I have been playing with my new Melia Newman stamp called Ruby Slippers from Queen Kat Designs.  I decided that those slippers don't necessarily have to be ruby red, so I used my Copics and colored in Halloween colors.
I distressed the edges with Bundled Sage and Faded Jeans Distress Inks from Tim Holtz; Stickled the shoes and kitty wings for shine; and added black jewels for a small border.
Next, I had to decided what to do with it!!  Did you hop along with us during the QKD Thirteen Days of Halloween Blog Hop?  One of our designers showed us an unusually-folded card with what I can only describe as "zigzag" edging on the top.
I liked the design, and eyeballed it and made my own template out of a 8.5"x12" piece of cardstock.  I cut the paper on a diagonal at 3" on one end and 5" at the other. Then I scored each at 2" intervals and mountain/valley folded each piece, joining the two at the back for a 4" width and 5.5" height.

There were just too many panels to worry about, so I attached the back two and made it into a top-loading pocket, in which I slipped a tag with my card's sentiment.
I found this killer patterned paper in my stash file, with great shades of teal, orange, green and blue, all of gears and circles, very steam punk.  That set the color and the mood of my card.  I mixed this patterned paper with a coordinating lighter blue and used a couple more QKD stamps directly onto the panels.
I stamped my Batty Background in black on each of the two panels on the ends.  Then on one side I stamped Cranium Man on the next panel, adding a couple Skittles and some lace.
On the other side, I used two more QKD stamps, Street Lamp 2 and Briggitte.  Of course I couldn't let them stand alone, so I colored Briggitte with a little Copic and Stickled the lamp post.
 My card was almost finished, but when I closed it, it lacked a focal point on the front.  So I turned to a QKD stamp called Clockwork Butterfly.  I used coordinating colors of Copics, then popped on some tiny black brads for definition.  
Although it looks centered on the front, I only adhered it to the right side, which left me room to add one more embellishment on the left.  And then, finally, my card was complete.  And here is what it looks like folded (almost) closed.
And folded but kind of open!
I hope you like my newest card showcasing not only Melia's newly-released Ruby Slippers, but a handful of QKD stamps, all on one project!  And they're all available at the Shoppe!  
Happy crafting, and keep the Halloween spirit alive in your creativity!!

Sunday, October 14, 2012

Decorating for Halloween


It's time to show off one of the newest-released stamps from artist Terrell Dorfeo.  It's called Devil Skull and you can find it in the Shoppe right now!  I paired it with a couple more QKD stamps and made some wall art.
First, I painted a 99 cent window box frame with black paint and added bone stickers and glitter to the edges of each window.

Next I stamped Devil Skull twice.  I colored her with Copics and cut the first, full image to fit the middle frame.  I fussy-cut the second image and adhered it with dimensional tape.  I used Liquid Glass for the shine in her eyes, horns and tail.
I used a fantastic QKD background stamp called Skulls Background to use in the long window at the bottom.  I stamped it three times, right smack against each other, for a long panoramic scene.  I used Tim Holtz' Distress inks and blotted a bit of color onto my gruesome scene, adding some Stickles in different shades for some shine.  To this window I added a paid of eyes, compliments of Martha Stewart.  A single teardrop jewel was attached.
In the right hand corner window, I stamped on patterned paper with another QKD stamp called Just Batty Background.  I added a wooden gravestone embellishment.

The last window was decorated with patterned paper and another MS sticker.  To finish off my wall decor, I added a few nasty little spiders around the frame and in the windows.  They were a steal from Target for $1 for a huge container of them!

I hope you like my wall art.  You can get all the QKD stamps that I used here at the Shoppe.

Saturday, October 13, 2012

Happy Halloween with QKD's 13 Days of Halloween Blog Hop

Well, on this last day of QKD's Thirteen Days of Halloween Blog Hop, I hope you have enjoyed some spooky inspiration, learned a couple tricky techniques, fallen for your new favorite QKD stamps and found some fun in our blogs. If you have just today stumbled onto the blog hop here, oh my goodness, you have a lot of work to do, but you'll reap in a lot of inspiration!  Just start at the QKD Main Blog.
For those who have been hopping throughout the month, thanks for sticking with us.  If you came from Beth's blog today, you got it right!!
We want to wish you all a HAPPY HALLOWEEN today, and I have a great project to share with you with that theme.  I made this bookmark and gave it to my hubby.  From the smile on his face, I think he will have a Happy Halloween every time he picks up the Dean Koontz book he's reading now (perfect timing for the season, huh?).
I used a stamp called Bodice and colored it in Halloween colors.  I used my Epic Six to cut out the frame for my image.  I had a piece of felt pumpkin border left over from another project that I popped onto the front.  A large black brad and a bit of ribbon finished off my project.
Now it's time to pay a visit to Janie and see what she has to offer you on this last day of the blog hop.
Happy crafting, everyone!  Enjoy the holiday!

Good Friends Never Go Out of Style

Today I made a Z-fold card for you featuring Melia Newman's Ruby Slippers.  I colored this Queen Kat Designs' image with my trusty Copics and gave the shoe's pearls a little shimmer with Stickles.  Then I diecut my image with my Epic Six and lacy scallop die from Nestabilities.
I used CTMH patterned papers and embellished with lots of shiny sequins in Fall colors.  The sentiment inside is the same as my post title, "Good friends never go out of style".  I love those kick-ass red stilettos that the fairy Kitty is protecting (from my daughter, who at 17 loves stilettos)!  A couple of ribbon bows complete my card and it is already in the mail to my partner in my Yahoo Group's 1-for-1 card swap!
Love Melia's stamped image?  Check out all her art at the Shoppe.  Don't forget to check out the 13 Days of Halloween Blog Hop hosted by Queen Kat Designs.  Start at their main blog for your chance to win some awesome prizes!

Tuesday, October 9, 2012

QKD Puts the Cute In Halloween with Its 13 Days of Halloween Blog Hop


BOO!!  If I didn't scare you, maybe I can inspire you with Day 9 of Queen Kat Design's 13 Days of Halloween Blog Hop!
Today the Royal Stamping Maidens have put the CUTE in Halloween crafting!  If you came here from BETH's Blog, you're on the right path.  If not, trip on over to the QKD BLOG where you can start your adventure today.

So here is my personal take on what CUTE looks, Halloween-style.  I altered a wooden tag with textured, patterned papers, a batty diecut border, a snippet of     K & Co. border, ribbons and googly eyes.  I colored a Che Gilson stamped image called Bunny Chan with Copics.  There's a flourish woven behind the image to give the whole thing a little sparkle, as well as a line of tiny black jewels below that eye-ball border.

Now it's time to hop along to Vikki's Blog, where she is sure to delight you with her creation.  Please leave a little crafting love before you go!


Monday, October 8, 2012

Day 8 of QKD's 13 Days of Halloween Blog Hop


Welcome to Queen Kat Design's Thirteen Days of Halloween Blog Hop!  If you've come here from the QKD Main Blog, you are on the right track.  I hope you've enjoyed all the cards and projects using stamped images from the Queen's royal court of talented artists.  Today the theme of the Hop is PUMPKINS.
I had fun coloring and creating with another of Maigan Lynn's girls.  I colored the scene with Copics, then tore it and placed it onto an orange cardstock frame.  I wanted to carry the distressed look onto the card so I inked the edges of my card base.
I embellished my Halloween card with an extra pumpkin, some black brads and a stray feather from my junk drawer.
I like my card but it makes me sneeze. I'm allergic to cats and I think part of the allergy is psychological!!  Are you a cat person?  Most cats know I'm allergic and like to ignore me and lull me into thinking they'll leave me alone, then pounce on me when I'm relaxed and vulnerable!!  How do they know?!
It's time to hop along to Beth's Blog now.  Don't forget to leave some love before you go.  Hope you enjoyed your visit!!

October 8: Pumpkins
Pat (that's me)

Gorgeous New Line at Squigglefly

There is a new artist at Squigglefly that I am showcasing today.  Her name is Inger Harding and she has some beautiful work available for sale.  Here, I used one of a set of digital color images on a card made with specialty papers.  That's this week's challenge at the Squigglefly Challenge Blog, to use specialty paper.
My card is built with cardstock, glitter paper and handmade paper with lots of lovely fibers.  I printed out Inger's image and framed it with black cardstock. I cut a piece of the glitter paper the exact same size as the image and framed it also with black.A larger piece of cardstock makes a colorful backdrop for my image.  I embellished with pearls on the right, as well as a large snowflake with a vintage button, and a sprinkle of stars. A coordinating bow finishes off my card.
You can find all the new releases at Squigglefly.  Grab a few and play along with us in this week's challenge!!

Sunday, October 7, 2012

Inspiration Blooms with QKD's 13 Days of Halloween Blog Hop

Welcome to Queen Kat Design's Thirteen Days of Halloween Blog Hop! If you've come here from  Beth's Blog you're on the right track.  If not, start at the QKD Main Blog, because we wouldn't want you to miss any of the fun! We are halfway through our thirteen days of Halloween fun and inspiration. Today the theme of the Hop is Flowers.
My card again uses the QKD stamped image from Charles Bristow called Voodoo Child.  I used the full image this time and framed it with Teal-colored glitter cardstock.
For my card base, I covered teal paper with this cool black diecut paper I found on the clearance rack at Marshall's.  I embellished the card with some teal webbing, black ribbon, jewels and these gorgeous black and gray flowers.
For more Halloween goodness, your next stop is at Janie's Blog.  Please leave a little love before you hop away!!  And if you get lost, below you'll find the Order of the Hop with links to all!

October 7: Flowers
QKD Blog http://qkd.blogspot.com
Aletha http://ajsalternativecreativeendeavors.blogspot.com/
Vikki http://qksc.blogspot.com
Beth http://www.inkcoveredgirl.com/
Pat http://patacakespages.blogspot.com/
Janie http://charisma3103.blogspot.com/
Stephanie L
Emily http://emsmanythoughts.blogspot.com/
Teresa http://mommameasfavoritethings.blogspot.com/
Kristi http://kristiscreativecafe.blogspot.com
QKD STORE http://www.katstamps.com

Saturday, October 6, 2012

Orange Theme for QKD's 13 Days of Halloween Blog Hop

Welcome to Queen Kat Design's Thirteen Days of Halloween Blog Hop! If you've come here from Tami's Blog, you're on the right track.  If not, don't miss out on the fun!  Start at the QKD Main Blog. From October 1-13, you'll see cards and projects using stamped images from the Queen's royal court of talented artists. Today the theme of the Hop is the color ORANGE!

Today I colored another fantastic stamped image from Maigan Lynn.  I love that Maigan sets the scene for you, so you don't have to worry about fussy-cutting your images.  Here my well-dressed witch is on her way to a Halloween party, where I'm sure she will enjoy more tricks than treats!
I placed my framed image onto an orange cardstock base.  I kept the design simple and clean by embellishing with black flourish rub-ons and a line of black adhesive-backed jewels.
So now it's time to wave goodbye as you hop along to JAMIE's Blog.  But before you go, please leave a little love!!

October 6: The Color Orange

Friday, October 5, 2012

Day 5 of QKD's 13 Days of Halloween Blog Hop


Welcome to Queen Kat Design's Thirteen Days of Halloween Blog Hop! If you've come here from Miranda's Blog, you're on the right track.  If not, start at the QKD Main Blog, because we wouldn't want you to miss any of the fun! For the next thirteen days, you'll see cards and projects using stamped images from the Queen's royal court of talented artists. Today the theme of the Hop is Skeletons/Bones.
I used the perfect image to showcase the theme of BONES.  It's called Werewolf and is by artist Rosanna Castellino.  After coloring my images with my trusty Copics, I cut it out and framed it.  Before placing it on my card base, I covered the base with black netting.  I embellished the card with a black jeweled flourish and a silver heart stickers.  I did use a little Stickles on the image, but kept the card simple and clean to make the image pop in my layout.
Where's the BONES part of it. you may ask?  If you look in her left hand, you'll see what she is snacking on.  She always likes a little midnight snack before curling up and going to sleep, especially after a night out on the town, painting it red (with blood).  Mwahahahaha!!
Next on the QKD Hop is BETH.  Before you leave, don't forget to leave a little love!  Thanks for stopping by, and as always, keep crafting!

October 5: Skeletons/Bones
QKD Blog http://qkd.blogspot.com
Miranda http://mirandascardcreations.blogspot.com/
Pat http://patacakespages.blogspot.com/
Beth http://inkcoveredgirl.com/
Vikki http://qksc.blogspot.com
Janie http://charisma3103.blogspot.com/
Emily http://emsmanythoughts.blogspot.com/
Kristi http://kristiscreativecafe.blogspot.com
QKD STORE http://www.katstamps.com

Squigglefly Sneak Peek Blog Hop

Psst!  For another Day of QKD's 13 Days of Halloween Blog Hop, click HERE!!

Good Morning, crafters! Welcome to the Squigglefly Sneak Peek Blog Hop!
Today the DT members are sharing with you sneak peeks of our release tomorrow over at the SQUIGGLEFLY STORE!
If you came here from LINDA's Blog, you are on the right track.  If you just happened along-make sure to go back and start at the beginning which is at the SQUIGGLEFLY CHALLENGE BLOG.
If you hop all the way through you will have several chances to win some prizes, get inspired, and have some fun!  One lucky hopper who comments on all the blogs will get FIVE Squigglefly digi's of his or her choice!

Today I am showcasing a soon-to-be-released digi image called Count Dracula Noah, by artist Cheryl Alger.  I love digi's because if you like this so much you have to have it before Halloween to make your project, it comes super fast, eight to your inbox!!
I used a sunburst design for the background of my card.  I cut a template to size, marking the lines first.  I kept the template pieced together, and one by one used each piece to cut out some Halloween patterned paper.  The first time I did this, I didn't leave the pieces together and it was like Humpty Dumpty -- I couldn't put the pieces back together again!!
Another hint when making this background design:  if there are words on the paper, make sure you place the template correctly so the words don't end up sideways or upside-down!

I printed Count Dracula Noah and colored him with my Copics, then fussy-cut him out and framed him with a large Autumn leaf.  I added shimmer to my card by using Stickles on his cape.  I embellished with a few foam stars in Halloween colors.
Now Noah is ready to sink his teeth into this year's Trick-or-Treating!!  uh, well, after he puts on some long pants!!!

Your next stop is Rhonda, but before you go, don't forget to leave a little love for your chance to win!!  As an added BONUS, leave me a comment on your favorite costume that you've worn, either as an adult or a kid, and I will choose a random hopper to send a little BLING to!!  Everyone likes bling, right?!

  The Blog Hop Order is below in case you get lost along the way.
Thank you for stopping by today and being part of our Squigglefly Sneak Peek Blog Hop.  Good luck and happy crafting!


Thursday, October 4, 2012

Let's Get Spooky with QKD's 13 Days of Halloween Blog Hop

Welcome to Queen Kat Design's Thirteen Days of Halloween Blog Hop!  If you've come here from the QKD Main Blog, you are on the right track.  For the next thirteen days, you'll see cards and projects using stamped images from the Queen's royal court of talented artists.  Today we offer you a SPOOKY theme.
Here's my take on what SPOOKY is all about.
My card features Queen Kat Designs stamped image "Voodoo Child" by artist Charles Bristow.  After coloring her with Copics, I set her in a cemetery scene with the full moon behind her. Stickles, pearls and seed beads embellish my scene.
I don't know about you, but first, I would not walk through a spooky cemetery in the middle of the night, and second, if I met up with this sultry lady, I would run like the scared rabbit I am straight into my bed, with covers pulled over my head!!
For more stamps by the very talented Charles, check out the SHOPPE.  Hoppers get a special Halloween treat during these thirteen days: a fantastic discount!  Click on the picture in my sidebar to go straight to the SHoppe and, well, SHOP!!
Next on the hop meet BETH and see her lovely offering today.  And if you get lost, below is the Blog Hop order with links for you. Wouldn't want you to miss out on the fun and inspiration!!
Oh, please leave a little love before you hop away!!


October 4: Spooky!

Stephanie L http://stephscreativechaos.blogspot.com/

Wednesday, October 3, 2012

Day 3 of QKD's 13 Days of Halloween Blog Hop


Good morning, crafters!  Today is Day Three of the Queen's 13 Days of Halloween Blog Hop. If you've come here from BETH's blog, you're on the right track.  If not, start your adventure at the QKD Main Blog, We have a fun line-up of cards to inspire you using the color purple, and you don't want to miss out on any of them!
My card today uses a lovely QKD stamped image from artist Maigan Lynn.  I colored my mermaid with Copics and framed it with a diecut lacy frame in purple.  A little Stickles in her hair gives it a bit of dimension.  Embellishments include a knotted ribbon, a stapled snip of same ribbon, and a handmade candy corn tag.
Now onto another great card at VIKKI's Blog (otherwise known as Queen Kat).  Before you leave, please leave a little love!  Enjoy your hop today!!

If you get lost, here's the Blog Hop Order:
October 3: The Color Purple
QKD Blog http://qkd.blogspot.com
Beth http://www.inkcoveredgirl.com/
Pat http://patacakespages.blogspot.com/
Vikki http://qksc.blogspot.com
Sue http://cardandjewelrycorner.blogspot.com/
Teresa http://mommameasfavoritethings.blogspot.com/
Janie http://charisma3103.blogspot.com/
WIS 2.0 http://whimsicalinksorority.blogspot.com
Stephanie L http://stephscreativechaos.blogspot.com/
Maria http://riacreations.blogspot.com/
Emily http://emsmanythoughts.blogspot.com/
Kristi http://kristiscreativecafe.blogspot.com
QKD STORE http://www.katstamps.com

Tuesday, October 2, 2012

Going Batty on Day 2 of QKD's 13 Days of Halloween Blog Hop

Welcome to Queen Kat Design's Thirteen Days of Halloween Blog Hop!  If you've come here from the QKD Main Blog, you are on the right track.  From October 1st through the 13th,  you'll see cards and projects using stamped images from the Queen's royal court of talented artists.  Today the theme of the Hop is BATS!
You can't miss the bat on my card, can you?!  This
weirdly cute Queen Kat Designs stamped image is a favorite of mine.  It's called "Vampire Bat Eye" by artist Nora Blansett.
I colored my bats with Copics, using Liquid Glass to put a little twinkle in their eyes.  Then I popped them onto an orange cardstock base, adding some black flourish rubons, the sentiment and a few jewels in the corner and on the bottom.  Simple design, as EYE wanted to let the images do the talking!

To show you how much fun this image has been to color and create with, I made a second card showcasing Vampire Bat Eye by Nora.  Here I used a piece of Neenah patterned paper with the quote, "One's mind, once stretched by a new idea, never regains its original dimensions."
Keeping it simple again, I framed my Copic-colored image, added a couple lines of small jewels, and placed a diecut border along the side.  I embellished my border with a handmade flower.

This is such a fun image, I hope you'll take another look at it in the SHOPPE.  As a special enticement, during the Blog Hop, customers can snag a special discount.  Just click on the picture in my sidebar for your QKD Halloween treat!!

Next on the Blog Hop is BETH, but be sure to leave a little love before you hop along!!


October 2: Bats
QKD Blog
Miranda
Pat  That's Me!
Beth
Vikki
Jamie 
Janie
Stephanie L
Emily
QKD STORE

Monday, October 1, 2012

Squigglefly Sneak Peek in Teal, Pink & White

(Psst! Click here for the QKD Thirteen Days of Halloween Blog Hop.

What's new today?  Squigglefly has a new weekly challenge, and it's a color challenge! They want you to use the color combo of: TEAL, PINK & WHITE.  I love these challenges because I use up my leftover stash!  Do you know how I organize all those leftover pieces of paper?  I keep them in a file drawer.  Each folder holds all shades of a color.  When I play in a color challenge, I pull the folders with papers in colors I need for the challenge--easy peasy!!

Today I made an easel card for you, in order to show off not one but two great Squigglefly artists and a wonderful quote.  My card base is layered with two shades of teal and some pink cardstock.

Closed, the card showcases a sneak peek at Fawn Palmer's soon-to-be-released "Baby in a Tutu".  This digi comes with two images, a baby crawling toward the viewer, and crawling away from the viewer.  I can see a lot of fun card designs using both together!
I printed the image twice, coloring the entire image once, and coloring just the upper body of Baby on the second.  I adhered the second with dimensional tape.  She really does look like she's moving toward you!
I embellished the face of the front with some K & Co Borders in pink and teal and added a teal feather behind Baby because, well, babies are so fluffy!! LOL

When my card is standing up on its easel, the soon-to-be-released digi "Always Do Your Own Thing" by artist Lynne Stansbery is showcased.
Aren't these little girls too precious?!  They look just like the girls in my daughter's ballet class (the one hanging upside down would be her cousin, Shenandoah)!  I used the same borders here too, cutting out the biggest butterfly from a leftover piece of it.

I decided to give the second digi image a dreamlike quality with torn edges because of the quote I snagged off of quotegarden.com.  It reads: "God gives us dreams a size too big so we can grow into them".
Which dreams have you grown into?  Do you ever dream of winning free digi's?  You have a chance this week with Squigglefly's color challenge--one random player who uses a Squigglefly digi image will win free digi's!  So strap on your dancing shoes and jete over to the their Challenge Blog for your turn in the spotlight!!
SNEAK PEEK BLOG HOP COMING OCTOBER 5!!  Want a sneak peek at the new releases??  Check out the Squigglefly Blog on October 5 for some fun, inspiration, and a chance to WIN 5 free digi's!!

QKD Thirteen Days of Halloween Blog Hop


Welcome to Queen Kat Design's Thirteen Days of Halloween Blog Hop!  If you've come here from the QKD Main Blog, you are on the right track.  For the next thirteen days, you'll see cards and projects using stamped images from the Queen's royal court of talented artists.  Today the theme of the Hop is Steampunk or Skulls.  I decided to use the very first QKD stamp I ever received, called Bodice.  I paired it with another stamp I fell in love with called Gothic Necklace.
For this card, I used a cardstock base that was literally a full sheet of black paper full of holes.  I backed it with white cardstock and used Orange and Black Stickles in each hole for a little shimmer.
I colored Bodice with my Copics in Halloween colors and again used Stickles for some shine, then fussy-cut the image. It is framed with patterned paper stamped with the Gothic Necklace in black.  I put it all against a black background, stamping Gothic Necklace again, this time in white along the top.
I had a lot of fun bringing the necklace to life by adding short chains, pearls, Stickles and tiny beads.  A few skulls and some stars and my card is complete.  I love my Bodice stamp, and have used it timne after time, from Halloween to Christmas to Valentine's Day.  You can find it and other fabulous stamps HERE.
I hope you like my Hop offering.  Now it's time to hop on over to BETH's Blog where you'll find inspiration for the upcoming holiday.  Before you leave, don't forget to leave a little love!!

October 1: 13 Days of Halloween Blog Hop Order
QKD Blog
Pat - That's Me!
Beth
Vikki
Janie
Emily
Kristi
QKD STORE